30 Gemini Prompts for Photo‑Quality Edits You Can Copy‑Paste
Updated at Oct 17, 2025
10 min
30 Gemini Prompts for Photo‑Quality Edits You Can Copy‑Paste
If you’ve ever stared at an AI image and thought, “Almost perfect—just not quite,” you’re not alone. The difference between good and photo‑quality often isn’t the model—it’s the prompt. This guide gives you 30 Gemini prompts for photo‑quality edits you can copy‑paste today, plus a framework to adapt them for your own workflows.
We’ll mix practical recipes, pro tips, and before/after intent phrasing so you can steer Gemini toward crisp detail, realistic lighting, and natural textures without overcooking your image.
Struggling to get photo edits that feel natural?
Whether you're cleaning up portraits or enhancing landscapes, Gemini can produce stunning results—but only if you give it the right prompt.
The truth is, most people only type in vague instructions like "make it look better" or "enhance the lighting" and then wonder why the results look off. Overexposed skin, plastic-like textures, unnatural shadows… sound familiar?
We tested 30 refined prompts designed to guide Gemini step-by-step toward high-quality, photo-realistic results.
Want to try it yourself?
You can paste any of the prompts below directly into Sider AI Image Generator and start experimenting right away—no setup required.
Why Gemini prompts for photo‑quality edits matter
- Consistency beats luck: Clear, structured prompting produces repeatable, high‑quality results.
- Photo realism needs constraints: Real‑world optics—lighting, lens, noise, exposure—should be named in the prompt.
- Editing ≠ Generating: When you’re refining an existing image, specify edit scope, preserve subject fidelity, and avoid global style drift.
By the way, if you regularly iterate on prompts, it’s worth noting that Sider.AI can pin reusable prompt templates next to your workspace and compare outputs side‑by‑side, saving time when dialing in photo‑quality edits across batches.
How to use these Gemini prompts effectively
- Point to the input: If you’re editing an image, reference it explicitly (e.g., “On the provided portrait…”).
- Set edit boundaries: Use phrases like “preserve identity,” “do not alter composition,” or “apply changes non‑destructively.”
- Name photo variables: Lighting, lens, color profile, focus plane, dynamic range, grain.
- Ask for realism safeguards: “Avoid plastic skin,” “retain natural pores,” “no haloing,” “no oversharpening.”
- Request variations: “Provide 3 subtle variants ranked by realism with rationale.”
Pro tip: End with a quality checklist so Gemini self‑audits the result.
Copy‑paste: 30 Gemini prompts for photo‑quality edits
Use these as‑is or tweak brackets [like this] to fit your image.
📸 Portrait & Beauty Retouching
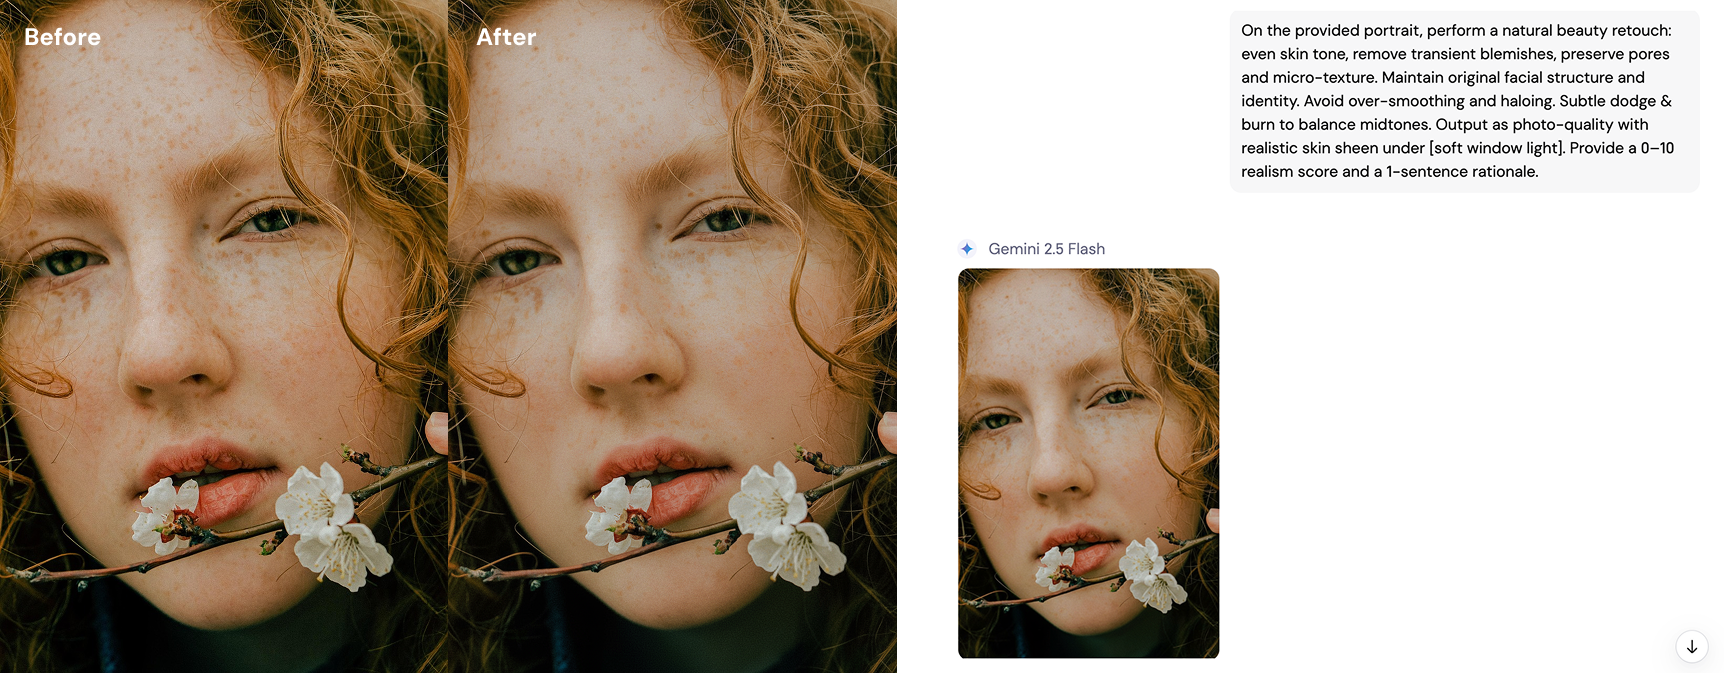
1) Natural skin retouch, zero plastic
"On the provided portrait, perform a natural beauty retouch: even skin tone, remove transient blemishes, preserve pores and micro‑texture. Maintain original facial structure and identity. Avoid over‑smoothing and haloing. Subtle dodge & burn to balance midtones. Output as photo‑quality with realistic skin sheen under [soft window light]. Provide a 0–10 realism score and a 1‑sentence rationale."
You can test this with Nano Banana AI Image Generator using the same prompt—just upload your own portrait.
2) Studio look from ambient light
"Relight the portrait to mimic softbox key at 45° and low‑intensity fill, preserving original catchlights where possible. No hard shadows on the neck. Keep background separation subtle. Output a photo‑quality studio look without changing pose or wardrobe."
3) Texture rescue without grit
"Enhance fabric and hair texture while suppressing color noise. No oversharpening halos. Maintain natural micro‑contrast. Bring out detail in [denim jacket] and [curly hair]. Photo‑quality, editorial finish."
4) Realistic makeup enhancement
"Apply natural makeup: even base, soft contour, subtle mascara, neutral lip. Respect face topology and avoid uncanny symmetry. No over‑retouching. Provide a photo‑quality portrait that reads editorial, not beauty filter."
5) Skin tone equalization across set
"Match skin tones across [3 portraits] to the reference image. Standardize white balance and exposure. Preserve unique undertones. Deliver photo‑quality consistency with batchable settings."
6) Realistic depth of field emulation
"Emulate shallow depth of field with believable bokeh shape (9‑blade, rounded). Keep subject ear‑to‑eye sharp at f/2.5 equivalent. Avoid cut‑out edges. Photo‑quality portrait rendering."
🌅 Lighting & Exposure Fixes
7) Color‑true white balance fix
"Correct white balance to neutral grays without flattening contrast. Keep skin undertones accurate (no magenta shift). Match to [D65] daylight. Show before/after histogram commentary and deliver a photo‑quality render with consistent color separation."
8) Dynamic range recovery
"Recover highlights and lift shadows while preserving contrast. No HDR halos. Protect specular highlights on [forehead and nose]. Keep black point anchored. Return a photo‑quality image with natural roll‑off in bright areas."
9) Lens simulation: 50mm realism
"Simulate a 50mm full‑frame lens at f/2.8; subject sharp, background gently defocused. Do not recompose. Maintain original perspective. Add slight longitudinal chromatic aberration suppression for realism. Output a photo‑quality edit."
10) Color cast neutralization
"Identify and neutralize green fluorescent cast while retaining ambient mood. Protect skin undertones and white garment neutrality. Deliver photo‑quality color fidelity with a measured tint correction."
11) Realistic HDR blend look
"Create a natural HDR look from single exposure: lift shadows slightly, compress highlights minimally, maintain midtone contrast. Absolutely no halos or crunchy detail. Photo‑quality tonal balance."
Tired of crunchy, overdone HDR? Try this subtle blend in the AI Image Generator to preserve that photoreal quality.
🎨 Styling & Grading
12) Realistic black‑and‑white conversion
"Convert to monochrome using a filmic S‑curve. Protect skin luminance, deepen shadows slightly, and avoid crushed blacks. Add a faint grain at 400 ISO equivalence for film realism. Output a photo‑quality B&W image."
13) Golden hour correction
"Shift lighting to golden hour warmth (approx. 5000K) with soft directional sunlight from camera left. Preserve sky gradients and skin balance. No orange banding. Photo‑quality with believable sun angle and soft shadow edges."
14) Food realism pop
"Enhance saturation and gloss on [dish] without plastic shine. Preserve steam and micro‑texture. Warm highlights slightly; no clipping. Photo‑quality appetizing finish suitable for menu print."
15) True‑to‑life color grade: Portra‑like
"Apply a subtle Portra‑like grade: soft contrast curve, warm highlights, cool shadows, rich but not neon reds. Keep skin luminous and believable. Avoid teal‑orange extremes. Deliver a photo‑quality JPEG with consistent hue integrity."
Love the Portra vibe? Try this prompt in Sider AI Image Generator to see how your image transforms with one click.
16) Authentic film grain add‑on
"Add realistic film grain at ISO [200], sized to 24MP equivalent. Grain should be luminance‑weighted, not color speckling. Maintain midtone clarity. Photo‑quality with filmic texture."
17) Subtle vignette for depth
"Add a gentle, circular vignette (-0.3 EV) centered on the subject, feathered broadly. No color shift. Enhance depth without revealing the effect. Photo‑quality finishing touch."
🧹 Cleanup, Repair & Artifact Fixes
18) Distraction removal, composition‑safe
"Remove [power lines/signage] without altering subject proportions or background perspective. Reconstruct missing textures plausibly. Photo‑quality cleanup; provide a short note on inpainted regions."
19) Moiré and banding fix
"Detect and reduce moiré on [patterned shirt] and fix banding in smooth gradients. Maintain edge acuity. Do not blur global detail. Return a photo‑quality result with clean tonal transitions."
20) Product photo polish
"For the provided product on white, remove dust/scratches, straighten perspective, and set a clean 255‑white background with soft shadow at 10% opacity. Keep brand color exact (ΔE < 2 if possible). Photo‑quality e‑commerce ready."
This one’s perfect for product photos—try it out on AI Image Generator and get a clean, polished image ready for listings.
21) Night noise cleanup, detail intact
"Denoise high‑ISO image while preserving fine edge detail and star points. No waxy surfaces. Maintain true color in low light. Deliver a photo‑quality night scene with natural grain structure."
22) Wardrobe lint and crease cleanup
"Remove lint and minor creases from [black blazer]. Maintain fabric weave. No smudge artifacts. Photo‑quality wardrobe cleanup for editorial use."
23) Print‑ready sharpening
"Apply output sharpening for [inkjet A3 print], factoring viewing distance. Sharpen only high‑frequency edges; suppress halos. Convert to Adobe RGB if needed. Photo‑quality print readiness."
🏞️ Composite, Replacement & Simulation
24) Realistic sky replacement
"Replace overcast sky with a subtle cumulus sky at late afternoon. Match color temperature and horizon luminance. Apply believable light wrap on subject edges. No mismatched reflections. Photo‑quality composite."
Sky looking flat? See how this prompt turns it into a natural daylight photo in Text-to-image tool.
25) Architectural verticals fix
"Correct verticals to true without cropping the subject. Preserve lens character and field of view. Maintain window glass reflections. Output a photo‑quality architectural edit."
26) Pet fur realism
"Enhance fur detail and directional light on [dog breed], avoiding crunchy sharpening. Keep eyes moist and catchlights intact. Respect natural coloration. Deliver a photo‑quality pet portrait."
27) Seamless background blend
"Blend subject edges into [gradient backdrop] without halos. Match shadow density and edge softness to lighting. Photo‑quality integration suitable for print."
28) Macro realism on small objects
"Sharpen only within the focus plane on [jewelry], simulate focus falloff consistent with f/5.6 macro. Avoid global clarity boost. Maintain metal specular highlights. Photo‑quality macro look."
29) believable motion blur
"Introduce directional motion blur to background consistent with subject movement vector [right→left]. Keep subject crisp via masked stabilization. No ghosting. Photo‑quality action feel."
🕶️ Glasses & Reflections/🪞 Subtle Structural Fixes
30) Glass glare reduction
"Reduce glare on [eyeglasses] while keeping natural reflections. Retain catchlights and avoid cloned artifacts. Preserve eye sharpness and iris color. Photo‑quality retouch."
A reusable structure for photo‑quality Gemini prompts
Use this template to write your own edits fast:
On the provided [image/portrait/product], perform [specific edit scope].Constraints: preserve [identity/composition/color accuracy]; avoid [oversmoothing/halos/banding].Photo variables: lighting [type/angle/K], lens [focal length/aperture], color profile [sRGB/film‑like].Realism checks: skin pores intact; natural highlight roll‑off; no plastic sheen; edges halo‑free.Deliverables: photo‑quality output + 1–2 sentence rationale + realism score (0–10).You can also chain tasks:
Step 1: Diagnose issues (white balance, exposure, noise) and summarize.Step 2: Apply minimal edits to fix only diagnosed issues.Step 3: Return two subtle variations; explain differences and recommend one.Common pitfalls—and how your prompts can prevent them
- Plastic skin syndrome: Mitigate with “preserve pores,” “no global smoothing,” “subtle dodge & burn.”
- Haloing and crunchy details: Ask to “suppress halos,” “avoid clarity overuse,” and “maintain midtone contrast.”
- Color drift in brand/product shots: Specify ΔE tolerance and exact color targets; reference a neutral gray.
- Unrealistic relighting: Call out light direction, softness, and falloff; request light wrap on composites.
- Depth‑of‑field artifacts: State aperture equivalence and bokeh blade shape; forbid cut‑out edges.
Workflow examples
Portrait workflow (5 minutes)
- Start with Prompt #1 to clean skin naturally.
- Apply #2 (white balance) and #3 (dynamic range) if needed.
- Finish with #25 (vignette) and #30 (print sharpening) for delivery.
Product page workflow
- Use #14 (product polish) to standardize backgrounds.
- Add #18 (verticals fix) for packaging boxes or bottles.
- Finish with #26 (natural HDR) for glossy packaging.
Social media food photo
- Run #15 (food realism pop) for appetizing color.
- Add #9 (golden hour correction) if shot in daylight.
- Apply #22 (film grain) for tasteful texture without compression ugliness.
Quality checklist to include in any prompt
- Skin micro‑texture visible at 100% zoom
- Natural highlight roll‑off (no clipped foreheads)
- Clean edges, zero halos
- Color‑true whites and neutrals
- Depth of field consistent with lens choice
- No repetitive inpainting patterns
- Noise controlled but not waxy
Add this as a closing line: “Confirm each checklist item in a bullet report.”
By the way: speeding up prompt iteration with Sider.AI
When you’re iterating on photo‑quality edits, switching tabs slows you down. Worth noting: Sider.AI lets you run Gemini alongside your reference images with docked prompts, quick‑swap variables (like lens or color profile), and a compare view for A/B outputs. The value is simple—fewer clicks, clearer choices, faster approval. You can even stash the quality checklist as a reusable block and apply it to every edit.
Key takeaways
- Photo‑quality edits come from precise prompts that respect real‑world optics.
- Name your constraints and realism safeguards to avoid uncanny results.
- Use the 30 copy‑paste prompts as building blocks; mix and match for your workflow.
- Add a quality checklist and request a rationale to self‑audit outputs.
- Consider a workspace like Sider.AI to standardize and speed up iterations.
What to do next
- Copy three prompts that fit your current project and try them on one image.
- Save your best‑performing phrasing as a template block.
- Add the quality checklist to every prompt for built‑in QA.
- Create a “lens & light” cheatline you can swap per shoot.
Happy editing—here’s to outputs that look like they came straight from the camera.
FAQ
Q1:How do I write Gemini prompts for photo‑quality edits that preserve realism?
Be explicit about constraints—preserve identity, control halos, keep natural skin texture, and define light, lens, and color. Add a realism checklist and ask Gemini to self‑score the output.
Q2:What’s the best Gemini prompt for natural skin retouching?
Use wording like “remove transient blemishes, preserve pores and micro‑texture, no global smoothing, subtle dodge & burn.” This keeps the edit photo‑quality instead of plastic.
Q3:Can Gemini fix white balance and dynamic range without looking HDR?
Yes—ask for D65 neutral balance, protect specular highlights, maintain the black point, and explicitly forbid HDR halos. Request a brief histogram rationale for accountability.
Q4:How can I make AI edits look like real lens blur?
Specify focal length, aperture, and bokeh characteristics (e.g., 50mm f/2.8, 9‑blade rounded bokeh). Tell Gemini to avoid cut‑out edges and keep the subject within the focus plane.
Q5:What’s a good workflow to get photo‑quality e‑commerce images?
Start with product polish (dust removal, straightening, true white background), correct verticals, and apply a natural HDR balance. Enforce brand color accuracy and finalize with print sharpening.
Recent Articles

How to Master ChatPDF: Faster Insights from Dense Documents

The best X Auto-Translation alternative for fast, accurate docs

Samsung AI Translation Unavailable in Iran? Practical Workarounds

Persian translate tools: a practical guide to faster, accurate work

The Best Grok alternative for deep, cited research

Top 15 Features of AI Image Generator You’ll Actually Use
Products
Wisebase
©2026 All Rights ReservedTerms of UsePrivacy Policy